To use rules to manage auto-validation, you add an autovalidation setting to a case using the rule wizard, in exactly the same way as you would add a comment to a case.
- Find a case (e.g. on the Archive case list or the Rejected case list) which is representative of the type of case that could safely be autovalidated at some level.
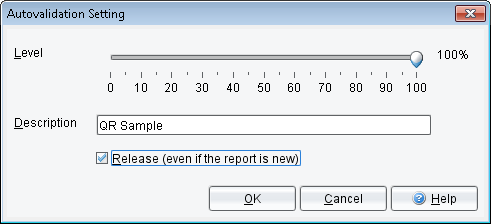
- Start the rule wizard to add an “auto-validation setting”, consisting of a percentage level and a textual description. You can select an existing setting, or create a new one.
- Create or select an objective for this rule, and finally
- Add conditions for the rule, check cornerstone cases, and finish the rule session.
To replace one auto-validation setting for a case with another using a rule, you select the current setting, then use the rule wizard to replace it with another one, in exactly the same way as you would replace a comment given for a case.
Finally, to remove the auto-validation setting for a case, you select the current setting and use the rule wizard to remove it.
You can see the list of all possible auto-validation settings using the menu from the main screen ‘Autovalidation | Autovalidation rule settings…’ This facility also allows you to edit the level of an auto-validation setting. The new level will apply to all cases with that auto-validation setting.
Notes:
- Auto-validation settings using rules will take priority over any levels that have been set using reports or report sections. See also Autovalidation.
- In general, if an auto-validation setting is given for a case, it will not be auto-validated if the report for
the case has yet to be enabled (or report section depending on the policy). See Allowing a report to be auto-validated.However, if you have checked the “Release” option in the auto-validation setting as shown below, then the auto-validation decision will be based only on the level you
have set, not whether the report has been enabled.