When reviewing a report, it is often helpful to look at the original request form corresponding to the test order. This can be achieved in a few different ways:
- Set up an attribute so that a keystroke launches an image viewing application with the image loaded.
- Send the lab number directly to the lab’s imaging application as a command-line argument.
- Send the lab number directly to the lab’s imaging application via TCP/IP.
- Paste the lab number into the imaging application.
These options are discussed in more detail below.
Using an image attribute
In many labs, request forms are viewed using a web-based application. The image for a case can be seen be sending a web address (URL), which is based on the case name, to a web browser. RippleDown can be configured to do this with a single keystroke, using an ‘image attribute’.
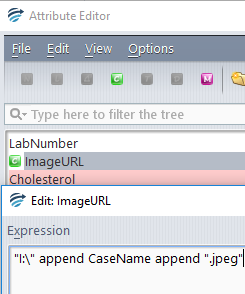
In the simplest case, the URL for the image for a case will represent a file in a shared network folder that contains images. For simplicity, let’s suppose that the images at your site are in a folder called “I:”, and that the image file for a case with name “09-123” is “I:�9-123.jpg”.
First we create a Calculated Value Attribute (CVA) that produces an image URL from a case name. In the example we are using, our formula would be
“I:” append CaseName append “.jpg”
as in this screen shot:
The next step is to set the project to use the image attribute just created. This is done by selecting it from the list of attributes shown by the “Set image lookup” item on the Support menu (for help on using the Support menu, please contact PKS).
Once these steps have been taken, the images can be seen from the validator using the Alt+F9 key combination (these are the default keystrokes, they can be configured to something else – ask PKS for help on doing this). The image will be shown in your workstation’s default viewing application for the image type. This is typically a web browser or fax viewer, but can be configured by your system administrator.
Note: In setting up an image attribute, you first need to talk to your local IT department to find out how the URL for the image of a case is related to the case name.
Note: If you want all projects at your site to to use the same image attribute, then set it up in the Administrator Attribute Manager.
Sending the lab number to a specific viewing application
Some sites use a particular application installed on each client workstation for viewing images. Typically, these applications take some key piece of information (such as the case name) as a command-line argument. In these circumstances, we can build a Calculated Value Attribute whose current value is the command for launching the viewing application for that case. This is very similar to the situation described above, in which we formed URL for the image.
For example, suppose that the program Microsoft Paint was to be used to view images, and that these were always stored in the directory “I” with filename “case name.jpg”. We could build a CVA with formula
“mspaint I:” append CaseName append “.jpg”
This attribute could be set as the image lookup attribute, as described above.
Note: The mspaint example works if the path to mspaint.exe is in the system global path, which is standard in Microsoft Windows. You may need help from your system administrator to put your local viewing application in the system path, or to form a CVA expression that points directly to that location.
Note: Again, if you want all projects at your site to to use the same image attribute, then set it up in the Administrator Attribute Manager. This could save a lot of setup and maintenance time and effort.
Sending the lab number directly to the imaging application using TCP/IP
Simply press the function keys ALT F9 which will send the required lab number directly to your lab’s imaging application.
Note: The ALT F9 facility requires some setup by your IT department. Contact PKS for more details.
Pasting the lab number direcly into the imaging application
Start your lab’s imaging application, click in the lab number field, and select paste (CTRL V). You don’t have to type in the lab number as RippleDown automatically inserts the case name into the Windows clipboard whenever you review a case. If the image lookup is not exactly the same as the case name, then set up an image attribute as above, and the values of this will be put into the clipboard.