A less conservative approach for managing auto-validation than using reports (see Managing auto-validation using reports) is to set an auto-validation level for each particular report section that can be given by the project. This approach is most appropriate for projects where the report sections are independent of one another, that is, the comments in one report section are given independently to comments in another report section.
An example of this type of project would be an MBA (Multi Biological Assay) project, where a separate report section has been set up for each clinical sub-domain (lipids, glucose, calcium, etc) and the comments for each sub-domain are relatively independent, that is, can be considered as separate “sub-reports”. In this situation, an auto-validation level can be defined for each sub-report, rather than for the complete report which is a combination of the sub-reports.
Setting an auto-validation level using report sections has the advantage that fewer levels need to be maintained as compared with setting auto-validation levels using reports. However, if the number of different comments in a report section becomes very large, it may again be advisable to use rules to manage autovalidation. (See Managing auto-validation using rules)
To set auto-validation levels on a report section basis:
- Set the auto-validation policy to use report sections using the menu Autovalidation | Policy and the associated policy window
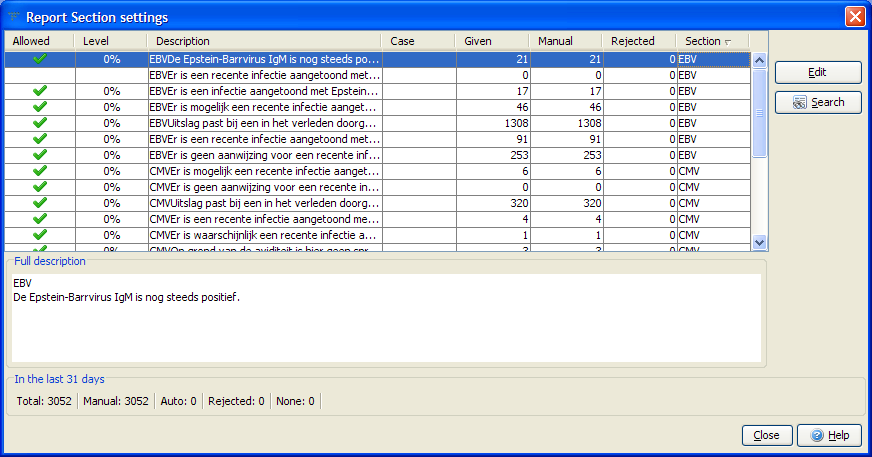
- Use the menu Autovalidation | Report Section settings to show a table of all sub-reports that have been recently given by the project, that is, given within the last month.
- Review each sub-report in the table. Sub-reports that already have some level of autovalidation set will have a tick in the Allowed column, and possibly a percentage in the Level column. Note that clicking on a column heading will sort the table by the values in that column. For example, clicking on the Given column will order the sub-reports according to how often each report has been given by the project.
- The Rejected column shows how many times the corresponding sub-report was corrected during validation, that is, was inappropriately given by the project. Sub-reports that are never, or rarely, rejected are possible candidates for autovalidation.
- If you decide to set a non-zero autovalidation level for a sub-report, click the Edit button and set the desired autovalidation level for that sub-report. The Allow autovalidation check box will be checked automatically if you set a non-zero auto-validation level.
Changes made to autovalidation settings will be effective immediately.
Tip: To see all the sub-reports for a particular report section, you can sort the table by clicking the heading in the “report section” column, as shown below: