A queue is a name for a list of cases to be shown in the Validator or Auditor. A queue is created in the Knowledge Builder, and assigned to cases using rules in the same way as you would assign a comment to a case. If the rule assigning the queue is true for some case, then that case is put on the corresponding Validator or Auditor queue. A queue can be named after some RippleDownuser, or some other descriptive name.
Queues can still be defined if the project is going to be externally validated default, that is, if validation is done using the facilities of the Online Information System rather than the Validator or Auditor. If a queue is defined, then any cases that are assigned the queue will be sent to the Validator for review, rather than to the Online Information System.
For a project set up to use the Validator, if a case requires review it is sent to the Validator’s default project queue. Similarly for the Auditor. If however you want certain types of cases to be reviewed by a particular user, you can specify that these cases should be sent to a queue for that user, rather than to the default queue. Similarly, if you want certain types of cases to go to a special purpose queue, rather than to the default queue, you can add a new queue as detailed below.
NOTE: For a Clinical project (i.e. being reviewed using the Validator), a case can only be sent to a single queue. Hence if more than one queue is applicable for a case, that case is sent to the first Validator review queue that is given on the list. For an Auditor project however, if more than one queue is applicable for a case, the case is sent to all the corresponding Auditor queues.
The queues defined for the project are shown in a window called “Queues” on the Knowledge Builder main screen. If there are no queues defined for the project, there will just be a single entry “Default” on the queue list. This indicates that cases requiring review will be sent to the Validator’s (or Auditor’s) default project queue.

To add a queue:
1. Use the right click menu and select Add queue,
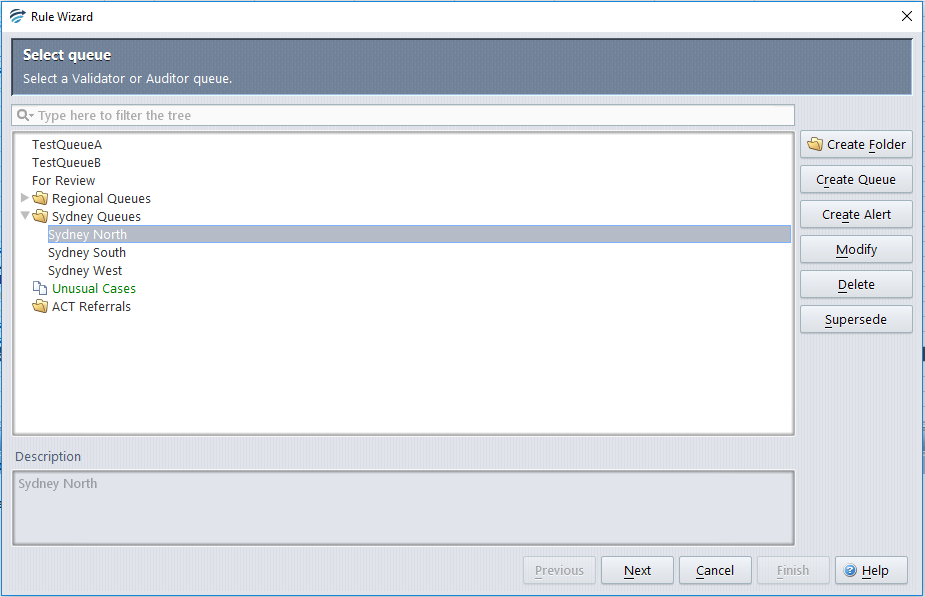
2. The first Rule Wizard step “Select queue” will now appear, showing a list of all RippleDown queues as shown in the example below. Select one of the queues on the list, or add another queue name using the Create Queue button, and click Next.

3. Either select an objective or create a new one and click Next. You are now in the condition building part of the rule wizard. Add the conditions under which you want cases to be sent to that queue, rather than to the default queue. Then click Finish.
The new queue will be the first on the list showing in the Review window.

